The web app should be registered in your Azure AD. In here it will be possible to manage which permissions the web app should have on your Office 365 environment.
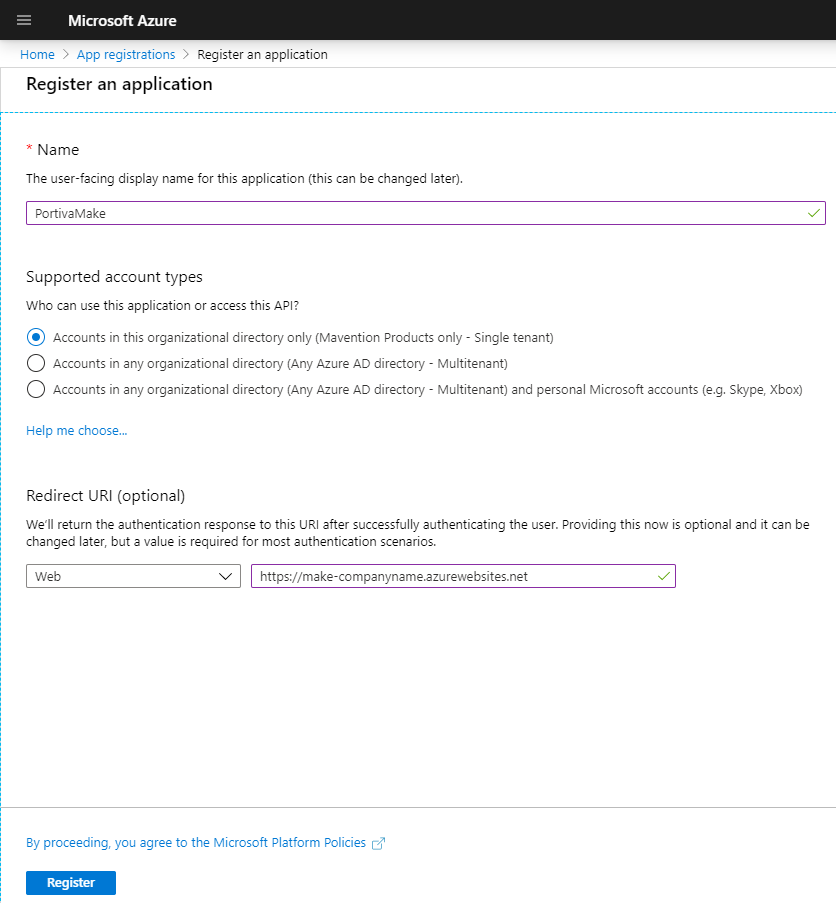
Go to the section ‘Azure Active Directory’. In the menu choose for the option ‘App registrations’. Click on ‘New registration’.
Enter a name for the App registration, e.g. ‘Make’. The application type should be ‘Web app / API’. The Redirect URI is the URL of your web app, e.g. ‘https://make-companyname.azurewebsites.net’. Click on ‘Register’ to create the app registration.
Figure 1: Register an application
Once the app registration is created, open the app registration. Copy the Application ID and paste it in the Configure.Make.Online.config between the tags ‘AzureADApplicationId’. In the config file between the tags ‘AzureADDomain’ fill in your primary Azure AD domain name. E.g. if the name of your tenant is ‘https://portiva.sharepoint.com’, the name of your Azure AD by default is ‘portiva.onmicrosoft.com’ unless you added your own domain name and set that as primary.
Key App Registration
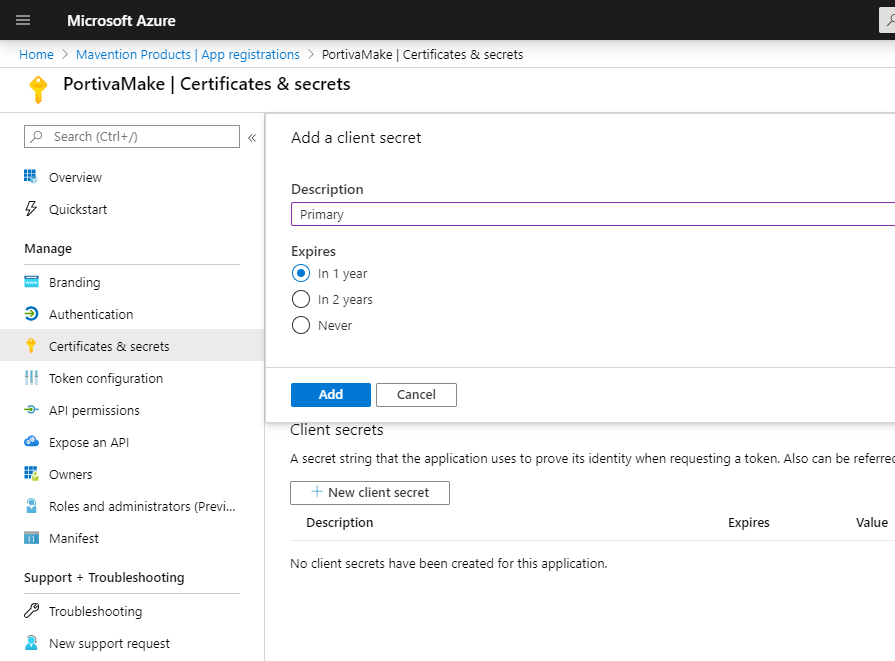
Now click on ‘Certificates & secrets in your app registration. Click on ‘New client secret’ Fill in a name for your key, e.g. ‘Primary’. For ‘Expires’ we recommend selecting ‘In 1 year’ and click ‘Add’. You will now see a Value of your newly created key. Copy this key and paste it into the config file Configure.Make.Online.config between the tags ‘AzureADApplicationKey’.
Figure 2: Certificates & secrets
Important!!! |
This key should be renewed before it expires. Make a note for yourself to renew this key before it expires. |
Required permissions
Before the web app can communicate with your Office 365 environment it should have the proper permissions.
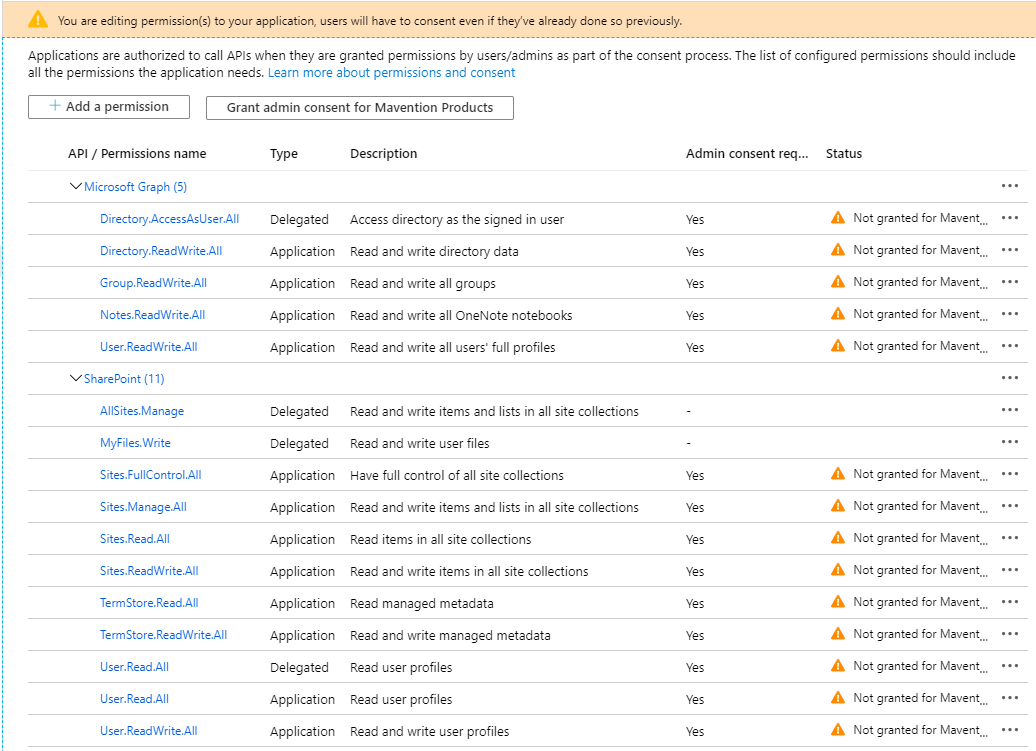
In the app registration click on ‘API permissions’. We will add to the permissions types, Office 365 SharePoint Online and Microsoft Graph. We will begin with Office 365 SharePoint Online.
Click on ‘Add a permission’, select the API ‘SharePoint’. Select ‘Delegated permissions. Add the following permissions:
- AllSites.Manage
- MyFiles.Write
- User.Read.All
Select Application Permissions and add the following: - Sites.FullControl.All
- Sites.Manage.All
- Sites.Read.All
- Sites.ReadWrite.All
- TermStore.Read.All
- TermStore.ReadWrite.All
- User.Read.All
- User.ReadWrite.All
Click on ‘Add Permissions’. The permissions will be added.
Now we will add the API of Microsoft Graph. Click on ‘Add a permission and select ‘Microsoft Graph’. Select ‘Delegated permissions. Add the following permissions:
- Directory.AccessAsUser.All
Select Application Permissions and add the following:
- Directory.ReadWrite.All
- Group.ReadWrite.All
- Notes.ReadWrite.All
- User.ReadWrite.All
Figure 3: Grant Permissions
- Click on
Grant admin consent.
NOTE |
If you forget to click on ‘Grant Permissions’ Make won’t be able to communicate with Office 365 SharePoint Online and Microsoft Graph. |
Reply URL’s
Click on the link next to ‘Redirect URIs’ (figure 3).
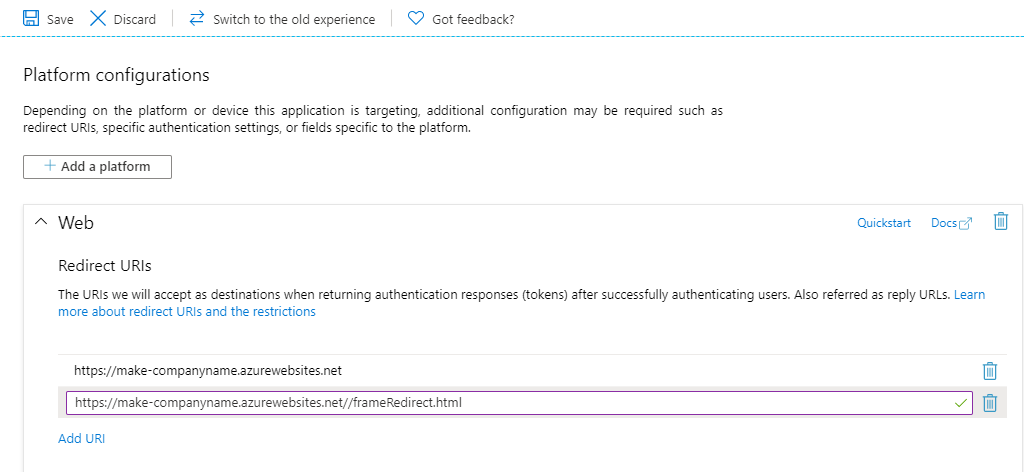
Figure 4: Reply URIs
You should see the URL of your make website that you have already filled in at Sign-on URL. You should add an additional URL. This additional URL is the URL of you web app followed with ‘/frameRedirect.html’, e.g. ‘https://make-companyname.azurewebsites.net//frameRedirect.html’.
Figure 5: Redirect URIs


